Deck bench plans
Deck bench plans for an attractive addition to your patio. This is is the kind of woodworking project that is deceptively simple. To look good, it has to be built accurately.
 Build a Deck Bench
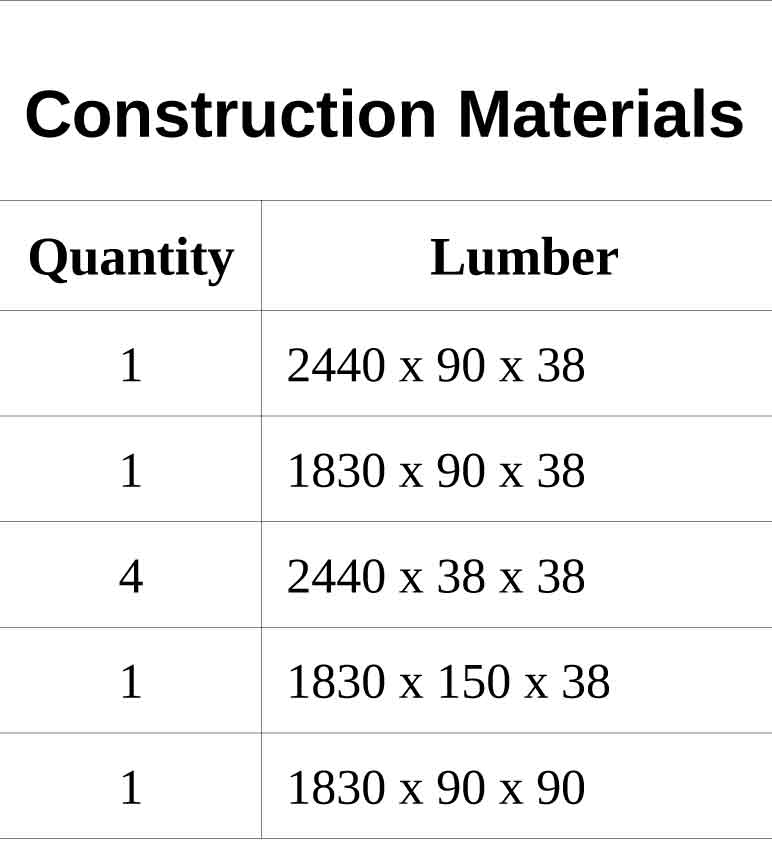
Deck bench plans parts list
 Exploded view
The dimensions for the deck bench plans are taken from the Sketchup model.
Part A 1220x90x38 Make 2
Part B 374x90x38 Make 2
Part C 1144x90x38 Make 8
Part D 374x90x38 Make 2
Part E 374x140x38 Make 4
Part F 310x90x90 Make 4
The sizes I have shown here are simply a guide..
For a woodworking project like this I would use cedar or golden cypress, also known as Macrocarpa in Australia and New Zealand.
Tools
For these deck bench plans I think a table saw and a thicknesser would be essential tools.
A band saw would be handy for resawing your timber.
Step by step building instructions
Preparation
I would make a simple jig to hold the slats in place with a 9mm gap.
Simply a piece of scrap wood with a set of screws that poke out just enough to grip the slats.
Start with part C, rip lumber to 38mm square, in lengths of 1140mm.
Lay out on flat surface with 9mm gap using the jig I invented.
 Measurements for the frame
To make a record of the length I would use something called a story stick to record the dimensions as shown. Note to self - don't forget to add 18mm for the gaps on both sides.
This is the length to cut for part B, D and E. If I had a chop saw already set up to cut multiple lengths, I would do that now.
Illustration showing part B on each end of the slats. Record this distance on my story stick and transfer it to part A.
Now I am ready to make the frame.
Step 1
 Step 1
To make the frame I would make two L shapes using a builders square.
Join the two L shapes to make the frame.
Because the screws are so close to the edge, I would feel more comfortable drilling 3mm pilot holes.
The old trick is to measure diagonally from corner to corner to make sure the frame is square.
Step 2
 Step 2
Lay the frame on a flat surface.
The slats should fit with 9mm spacers between each slat.
The red dots show the pre drilled pilot holes.
I thought long and hard about how to hold the slats in place while driving screws into the ends. This is how I would do it.
Shown white in the illustration is a piece of scrap board with screws at each position. The screws are driven so that only the point sticks out, thus holding the slats in place.
Do the same for the other side.
Step 3
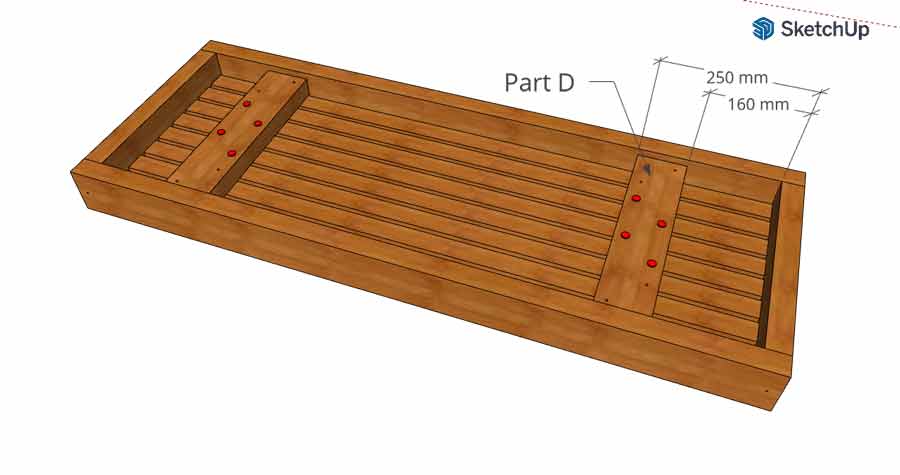 Step 3
Mark the position of the leg assembly.
This is part D, checking for a proper fit and the red dots show where the deck screws would go.
Step 4
 Part E Dimensions
 Step 4
Now that we have the frame and the slats assembled, it’s time to think about the legs.
Making the legs as an incomplete, that means fixing Part E to one side only.
Once again showing the deck screws as red dots.
Note the position of the screws in the nearest corner. If I measured the same distance off the edge, the screws would clash.
Step 5
 Step 5
Showing the legs sub assembly in position.
Once again, the red dots show the position of the deck screws.
Step 6
 Step 6
The last construction step is to fix Part E in place.
The red dots show the position of the screws.
Tip.
I like to offset the screws at least 20mm from the edge. Sometimes they will clash with each other.
So in this instance I would make sure to position the screws so that does not happen.
Download Deck Bench Plans

If you like, you can download a PDF copy of the deck bench plans.
The file includes everything on this page without the ads.
Conclusion
And there you have it. I hope you have enjoyed using these deck bench plans.
More Woodworking Projects
Have a look at my collection of 3D Warehouse DIY projects. At the moment I have 160 models you can view and download.
Most of them have exploded views showing how the parts fit together and sometimes even a cutting list.
Books on outdoor woodworking

OUTDOOR WOOD WORKS: WITH COMPLETE PLANS FOR TEN PROJECTS By Tina Skinner
Projects include gazebos, flower boxes, retaining walls, playsets for children, bird houses, dog house, chair, picnic table and storage shed.
Share Photos of Your Latest Project
Have you completed a project that you would like to share?
This is the place to share photos and stories with fellow woodworkers.
Do you have photos to share? Simply use the forms below and click the submit button.
Scroll down to see what others have made.

How to turn your hobby into a profitable business.
Solo Build It! (SBI!) is an online platform that empowers solopreneurs to build profitable online businesses. For over two decades, SBI! has been trusted by members to turn their passions, hobbies, or skills into successful ventures. Recently, the introduction of ChatGPT has ushered in a new era of AI-assisted content creation within SBI!.
Allow me to introduce you to Tai, your business-building AI assistant. Tai is now available in SBI! and can help you navigate the world of online entrepreneurship. Whether you’re a complete beginner or an experienced solopreneur, SBI! provides everything you need to create an income-generating website or blog.
Here are some reasons why starting an online business with SBI! and Tai is a great choice:
- Adaptable Lifestyle: Building an online business adapts to your desired lifestyle. Enjoy newfound freedom without being tied down to another job.
- Low Startup Costs: You don’t need significant capital to begin. All you require is a computer, internet access, a roadmap, and an affordable platform like SBI!.
- Flexibility: Work as much or as little as you want, wherever you choose. Once you’ve built a solid foundation, you can earn money even on days you don’t actively work.
- Portability: Take your business with you, especially if travel is part of your retirement dream.
- Global Impact: Help people worldwide by sharing your knowledge and expertise.
- Continuous Learning: Running an online business keeps your mind active and energized.
SBI! combines education, tools, and a proven process to give you the highest chance of achieving your financial goals. Whether you’re aiming for financial independence or simply want a rewarding project during retirement, SBI! can guide you.
If any of this resonates with you, I invite you to explore SBI! and discover how it can help you build your online retirement business. Even if you’re a beginner, SBI! provides the resources you need to succeed. Say hello to Tai and embark on your entrepreneurial journey! 🚀
Learn more and try Tai for free on the Solo Build It! website.
Recent Articles
-
doll's pram on wheels
Mar 09, 25 08:53 AM
 My name is Maryvonne Please, could you help me? I want to build a doll pram but I would like a plan. Thank you very much for your answer.
 -
Toy doll high chair
Mar 09, 25 08:52 AM
Dear Sir/Madam I am looking for a plan to build a toy doll high chair, I built the rocking horse you have on your page from one of your plans and it worked -
Angle of ramp
Mar 09, 25 08:51 AM
 Hello there I found your website whilst looking for details of how to make a new ramp for a walking ladybird that belonged to my children in the 90s. The