Homemade Wood Toys
Home made wood toys and wood toy patterns. This is a work in progress, I shall update it from time to time.

I found this photo of a boy on a tricycle on Pinterest. I liked it so much I thought I would like to make one.
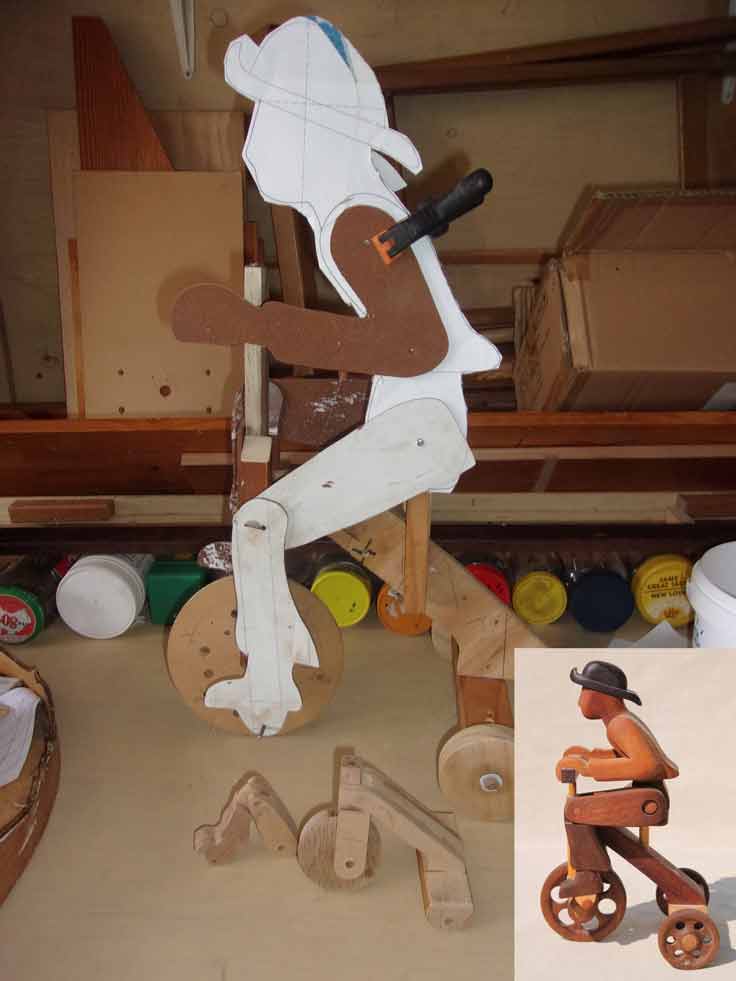
The story so far. A photo of the latest iteration of the proof of concept. Made it 3x larger, cut the legs and arms out of hardboard, and the body is roughly cut out of cardboard.
You can see the first one I started to make in the foreground, and get an idea of how small it is. Which is why I decided to make it bigger.

I made a quick sketch for the parts. The description says the toy is about 7.5 inches tall.
I am beginning to think that is a typo, because it turns out way too small.
My second attempt is 3x larger, and I think that is a little to large.

These are the bicycle parts. I thought the joint between the frame and the column would never be strong enough according to the direction of the grain.
Also, how would I cut out the gap in the steering column to fit the wheel?
So I decided the best approach would be to laminate three pieces with paper in between. The paper would allow me to cut out the parts in one go, and separate them afterwards.
A common practice when making duplicate parts. I do believe even wood turners use this technique for delicate parts they may want to turn on a faceplate.
With parts this small, I realized that newsprint was a better option than normal photocopy paper. It forms a weaker bond, making the parts easier to separate.
In time, I shall make a sketch to better illustrate this idea.
One more thing, the center part should be slightly thicker than the disc I am using for the wheel.
I plan to make the wheel from a piece 9mm thick, and the sketch shows the center of the steering column to be 10mm thick. In fact, I think that would be a minimum thickness.

Here is the tricycle part with the arms ready to cut out.
Studying the plans, I was trying to figure out how the joints are articulated.
I took the idea for the steering column and applied that to the articulated knee joint. So, I thought the legs should be laminated from 3 pieces, cut to shape and separated.
For the thigh part of the joint, I would cut the middle bit, and for the bottom half, cut the two corresponding outer parts.
Difficult to explain, much easier to have a picture.

A photo of the knee joint.
Hopefully you can see the lamination as I have tried to describe. The top was made with MDF, and the lower half with MDF in the middle and maple on the outside.

This is the top of the other leg, showing the mistake I made with the articulated knee joint.
Don't ask me why, but I decided to use MDF here. I mean, the parts are so small, I could use any piece of scrap wood.
I tried to drill out the hole for the dowel, and the MDF delaminated.
This is as far as I have managed to get. As you can see, three laminates make the parts quite thick, a little too thick.
I have put this project to one side for the moment. Writing about it now, I realise that three laminates are not quite necessary.
It makes the rest of the toy out of proportion. The body would have to be a lot wider to fit.
Instead, I can use one solid piece and simply cut out a half lap joint so to speak. Silly me.
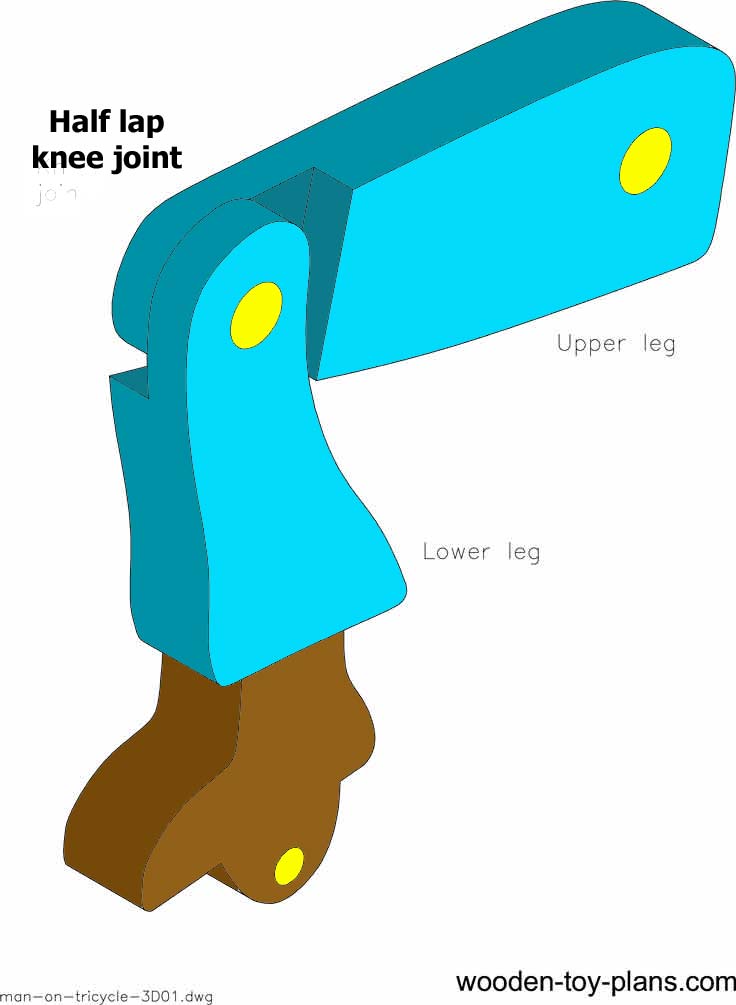 Articulate half lap joint
This is a better idea for making the legs. The knee joint is essentially an articulated half lap joint.
Another thing to consider is using smaller dowels, like bamboo skewers. I have considered toothpicks, but that make it a bit too small and not quite strong enough.
Making articulated joints

Why not use a copper tube to make a rivet? It would be easy enough to flare both ends against a washer, as shown in the photo.
I used a metal working center punch to start the flare, then with a series of light hammer blows, flared it out even more.
I am quite please by how it works. It spins freely on the copper tube rivet, and I tighten it up with a few more gentle hammer blows.

Here is my attempt at showing a cut away section of the copper tube rivet that I made for articulated joints.
Useful for knees and elbows, hips and shoulder joints.
Download the homemade wood toys templates
If you would like a free digital PDF copy of these homemade wood toy template patterns, you can fill out the contact me form below.
I am quite happy to share these template plans.
There are no instructions with this project other than the notes I have made so far.
I have also made a new set of templates at 30% larger.
It would be great if you could have a go at making one, and for you to let me know how you managed.
More homemade wood toys

This is the monkey on a tricycle that Mike Screen made.
This is one of the projects from the book he published Make Your Own Amazing Mechanical Toys.

Here is a monkey on a bicycle that I found on the Lumberjocks woodworking forum.
Inspired by a toy that he saw on eBay.
Here is another idea worth giving serious consideration.

How to turn your hobby into a profitable business.
Solo Build It! (SBI!) is an online platform that empowers solopreneurs to build profitable online businesses. For over two decades, SBI! has been trusted by members to turn their passions, hobbies, or skills into successful ventures. Recently, the introduction of ChatGPT has ushered in a new era of AI-assisted content creation within SBI!.
Allow me to introduce you to Tai, your business-building AI assistant. Tai is now available in SBI! and can help you navigate the world of online entrepreneurship. Whether you’re a complete beginner or an experienced solopreneur, SBI! provides everything you need to create an income-generating website or blog.
Here are some reasons why starting an online business with SBI! and Tai is a great choice:
- Adaptable Lifestyle: Building an online business adapts to your desired lifestyle. Enjoy newfound freedom without being tied down to another job.
- Low Startup Costs: You don’t need significant capital to begin. All you require is a computer, internet access, a roadmap, and an affordable platform like SBI!.
- Flexibility: Work as much or as little as you want, wherever you choose. Once you’ve built a solid foundation, you can earn money even on days you don’t actively work.
- Portability: Take your business with you, especially if travel is part of your retirement dream.
- Global Impact: Help people worldwide by sharing your knowledge and expertise.
- Continuous Learning: Running an online business keeps your mind active and energized.
SBI! combines education, tools, and a proven process to give you the highest chance of achieving your financial goals. Whether you’re aiming for financial independence or simply want a rewarding project during retirement, SBI! can guide you.
If any of this resonates with you, I invite you to explore SBI! and discover how it can help you build your online retirement business. Even if you’re a beginner, SBI! provides the resources you need to succeed. Say hello to Tai and embark on your entrepreneurial journey! 🚀
Learn more and try Tai for free on the Solo Build It! website.
Recent Articles
-
doll's pram on wheels
Mar 09, 25 08:53 AM
 My name is Maryvonne Please, could you help me? I want to build a doll pram but I would like a plan. Thank you very much for your answer.
 -
Toy doll high chair
Mar 09, 25 08:52 AM
Dear Sir/Madam I am looking for a plan to build a toy doll high chair, I built the rocking horse you have on your page from one of your plans and it worked -
Angle of ramp
Mar 09, 25 08:51 AM
 Hello there I found your website whilst looking for details of how to make a new ramp for a walking ladybird that belonged to my children in the 90s. The