Wooden Toy Car Plans

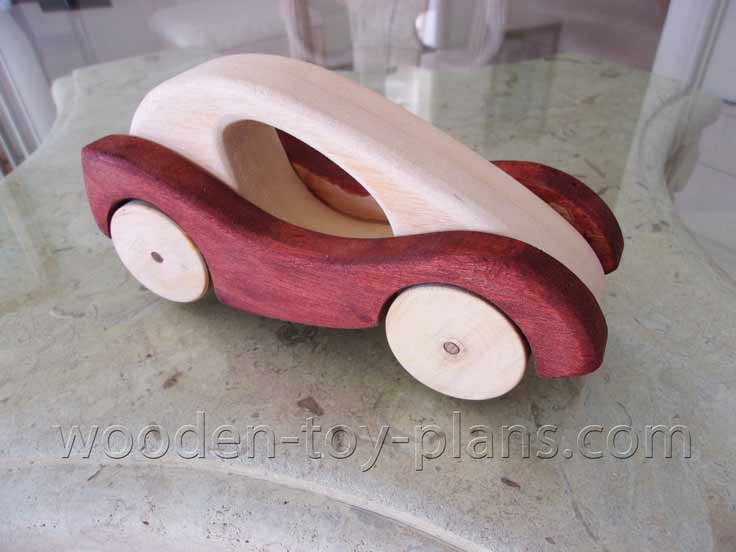
Part of a collection of wooden toy car plans. Based on the rumble seat roadster cars built in the 1930's, this single seat sports car features a dicky seat for an extra passenger. Sometimes called a mother-in-law seat.
This sporty little wooden toy car measures about 315mm (12.4 in) long, 160mm (6.3 in) wide and 115mm (4.5 in) high.
How to Make Toy Cars
The project is simple enough for beginners, yet interesting enough for toy makers with a little more experience. The challenge is in the method of construction.
Making toy cars is a lot of fun, they can be very simple profiles cut out with a band saw with a set of wheels attached.
This file contains the full size templates for the body parts, chassis and mudguards. Step by step instructions with photos are also included.
Simply print out each template page on your home printer, making sure the scale is set 1:1 or full size.
Materials
Most of the toys I have made using wood from the scrap bin or any timber I can find. These wooden toy car plans have been designed to use project timber available from your local hardware or timber supplier. Also known as one inch wood, or white wood it is ready to use for a project such as this.
Tools
This is a list of the tools I to nake this wooden toy car. Most woodworkers and home handyman already have most of these tools.
- Power drill.
- Scroll saw.
- Router mounted in a router table.
- Hand saw.
- Combination square
- Woodworking clamps.
- Hacksaw to cut the dowel axles to length.
- Sanding block with 120 and 80 grit sandpaper.
- A selection of drill bits.
Optional tools:
Some would say most of the pleasure of making toys is having the right tools to use. Everybody is different, some people would be happy to use the most basic of hand tools.
A router mounted in a router table is nice to have, but not essential to the completion of this project.
Likewise, I find a 12 inch disc sander very useful.
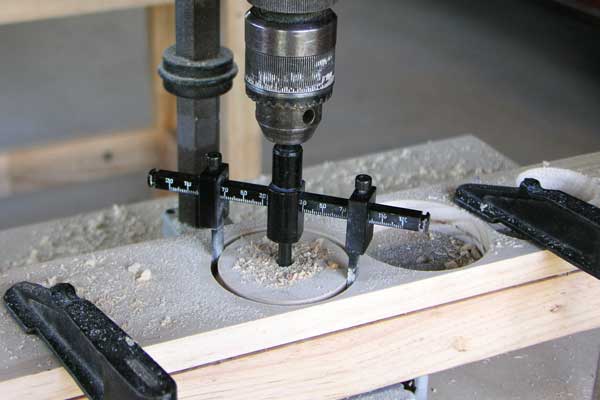
A drill press is also beneficial for making wooden toys, for drilling holes accurately for wheels and other moving parts.
I made my own wooden toy wheels using a circle cutter.
Step by Step Building Instructions
This is a preview of the building instructions which is part of the download package.

Exploded view showing how the parts fit together, colour coded for easier identification.
Step 1
 Step 1
The photo shows the parts A to D cut oversize, ready for gluing.
Parts B, C and D are laminated to make a thickness of 1 1/2 inches or 57mm.
They way I work, I prefer to cut the parts oversize before gluing them together because I find that the pieces tend to creep under clamping pressure.
That was before I discovered a type of wood glue that does not require clamping.
In the photo I have drawn red lines to show that these are the areas to clean up for step 2.
Step 2
 Step 2
In this photo I have cleaned up B and C.
The green lines indicate the areas to be left rough at this stage.
These areas are cleaned up in the next step.
Step 3
 Step 3
Showing the two sides fixed in place.
The bonnet is cleaned up, but the green area is left rough.
Step 4
 Step 4
Here I have cleaned up part D.
Using the template to locate the pilot hole for the dowel pin.
This is where a drill press would come in handy. I don't actually have one, so I used a drill guide instead.
Step 5
 Step 5
Position part D in the body sub-assembly, and mark the position of the pilot hole as shown by the red line.
We will use this mark to drill the hole for the hinge pin when the chassis is fixed in place.
The blue line indicates the shape of the bonnet to be cut out in the next step.
Step 6
 Step 6
Cutting the bonnet with a band saw. You could use a hand saw instead.
Sand everything smooth and round over the top edges ready for assembly.
Step 7
 Step 7
The chassis sub assembly in glorious technicolor. Note that the overall width should match the bodywork.
Part D, shown red, is in position with the hinge pin in a complementary shade of purple. This is purely for illustration purposes, the hole for the pin will be drilled at a later stage.
Be sure to leave a small gap between part E (yellow) and part D (red) to allow it to rotate freely.
Step 8
 Step 8
Fix the chassis to the bodywork. I used four wood screws as shown by the blue dots.
The red dot on the side indicates the hole for the hinge pin, as located in step 5. Drill the hole and fit the rumbler seat.
No doubt it will be a bit tight, so we need to shave a bit off. Check for movement and adjust accordingly.
Step 9
 Step 9
With the rumble seat in place, the area shaded red is sanded smooth, and the seat is rounded over.
Step 10
 Step 10
Now make the mudguards using a template. The red line indicates the centerline and the two blue lines are a pair of nails holding the template in place while tracing the outline of one half.
Flip the template over to create a mirror outline, using the holes left by the nails.
These holes left by the nails will be used as pilot holes for my circle cutter for cutting the wheel arches in the next step.
Step 11
 Step 11
Laminate the second piece to make up a thickness of 1-1/2 inches (38mm) with a wood screw in each corner without any glue, no, not yet.
Using the modified circle cutter for making wheels, I cut a hole through the first layer. This has the advantage of making a wheel just the right size.
It also leaves a v-shape groove in the layer below, which should be removed. This is why I have left it unglued.
I could take it apart and use a chisel or a router to remove the waste as shown in the sectional view.
Step 12
 Step 12
Here I have cut the fenders to shape, and cut the assembly in half along the centerline.
Not bragging, but I used a round over bit mounted in my home made router table.
The red dots indicate the hole made by the circle cutting. These indentations are going to help locate the holes for the axles.
Step 13
 Step 13
Fix the mudguards in place and drill the holes for the axles.
Wooden Toy Car Plans Free Printable PDF
Your free copy of the printable PDF wooden toy car project.
You might like these
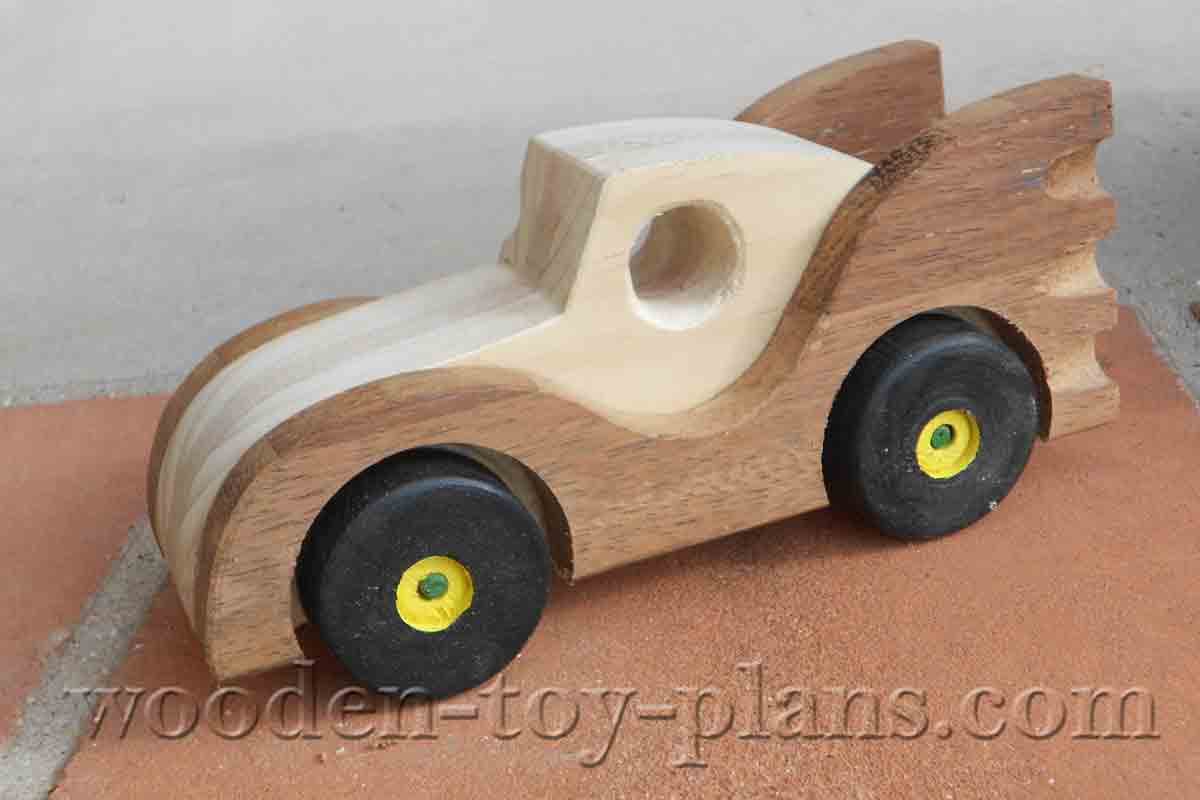
Batmobile Toy Car Plans build your home made toy. Full size templates.
Free plans to build your very own batmobile toy car out of wood. Simple design for beginners.
Wooden Toy Car Plans fun project free design
Free wooden toy car plans. Make your own wooden toy car with these free plans that include step by step instructions with diagrams and photos.
All about wooden toy wheels how to make them with or without treads
Tips and techniques for a quick and easy way to make wooden toy wheels. Simple and effective, all you need...
Making Wooden Toy Wheels
For these toy cars, I made my own wheels using a circle cutter mounted in a drill press.
It may be easier to buy ready made toy wheels.
A selection ofShare Your Toy Car Project
Would you like to share photos of the toy car from these plans?

- Home
- Boys Toys
- Wooden Toy Car
- Wooden Toy Car Plans
- Home
- Boys Toys
- Wooden Toy Car
- Wooden Toy Car Plans
Recent Articles
-
doll's pram on wheels
Mar 09, 25 08:53 AM
 My name is Maryvonne Please, could you help me? I want to build a doll pram but I would like a plan. Thank you very much for your answer.
 -
Toy doll high chair
Mar 09, 25 08:52 AM
Dear Sir/Madam I am looking for a plan to build a toy doll high chair, I built the rocking horse you have on your page from one of your plans and it worked -
Angle of ramp
Mar 09, 25 08:51 AM
 Hello there I found your website whilst looking for details of how to make a new ramp for a walking ladybird that belonged to my children in the 90s. The