Woodworking Jigs
Using woodworking jigs to do the following:
More woodworking jigs
As time goes by, I will be posting a few more woodworking tips and tricks.
Subscribe to my newsletter to stay informed.
A large part of the fun you can have in making things with wood is making your own tools and jigs.
Some jigs are for a specific purpose, others can be put to more general use.
In my humble opinion, the workbench is one of those universal woodworking jigs.
Here is a link to Jim Barry's listing of workbenches and jigs.
Drill a hole through a dowel
I saw a video online about how to drill a hole through a dowel.
Clamp the drill upside down in the vice, and the dowel mounted in the drill chuck.
To align the drill in the vice, first insert it upside dowel in the chuck, then clamp it in the vice. Release the drill and insert the dowel.
The hole is drilled by spinning the dowel, similar in principle to a lathe.
Sounds simple enough, and it is.
But what if the dowel is too big to fit into the drill?
Make a simple Clamping Jig
Sometimes not having a particular tool can lead to making something that is even more useful.
I needed a way to hold a 19mm diameter dowel, about 50mm long, in order to drill a hole through the long end.
I don't have a vice, so I had to make a simple clamping jig by drilling a hole into a block of wood.

This is how I did it. First you will need a bit of scrap two by four, which in this case measures about 38mm thick and about 75mm wide. Length does not really matter as long as it is long enough.
Drill a hole neat one end to the same diameter as the dowel. I used a spade bit, but I think a Forstner bit would have been better for reasons that will become clear later.
The dowel should be a snug fit, but I also wanted to make sure it could be clamped, so I made a saw cut through the centre of the hole, and drilled another hole for the bolt that you can see in the photo.
Why the second hole? To give the saw cut a bit more flexibility when bolt is tightened to clamp the dowel.
This was the original intention – to drill the hole for the clamping bolt and the second hole to make it more flexible. Make the saw cut, clamp the piece in position, drill the hole with the spade bit, or Forstner bit if you have one.
Leaving the piece clamped in place, insert the dowel and clamp it with the bolt. Be careful not to move anything.
Remove the spade bit and insert the next drill bit. A brad point works better for drilling holes in wood, but I don’t think you can get them smaller than 6mm.
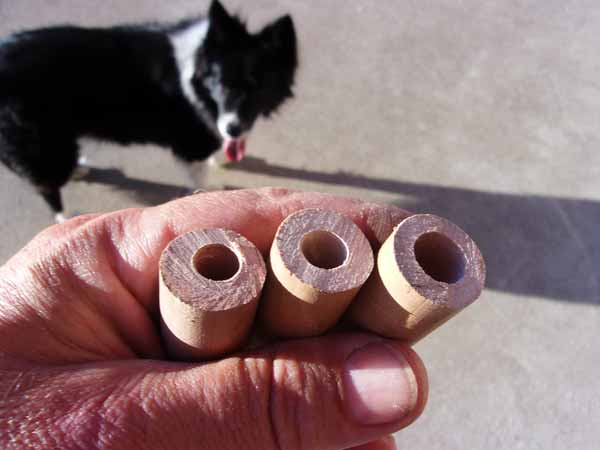
Here’s a few examples of what I made using different types of drill.
Starting from the left, that was a more common 10mm metalworking drill bit, as you can see it’s not quite in the middle.
Next is a brad drill bit, could be a little better with a proper drill press.
On the right is a 12mm spade bit.
These pieces are about 50mm long, just to see how it works.
A few thing I learned along the way:
With a proper drill press, I’m sure it would be possible to drill through longer pieces of dowel by drilling through one side then the other.
Forstner bit would be better because it would be more accurate to align the clamping jig.
Another tip is to mark the centre of the dowel with an indentation made by a centre punch.
How to find the centre of a dowel
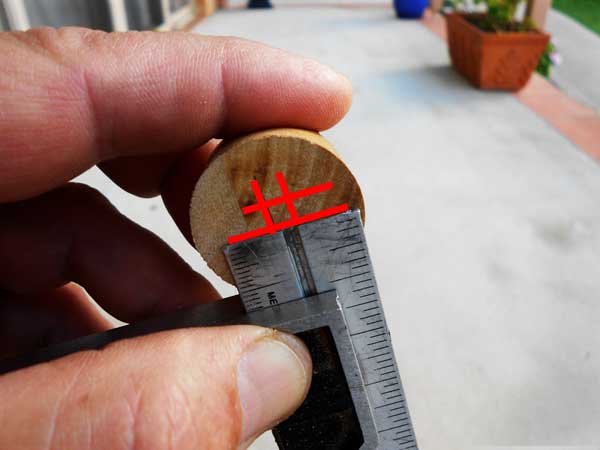
To be more accurate, I would need a drill press.
All I have at this stage is a drill guide made by Wolfcraft, with a small modification to accept my trusty Hitachi drill.
Share Your Woodworking Tip
Do you have any tips and techniques that you would like to share?

How to turn your hobby into a profitable business.
Solo Build It! (SBI!) is an online platform that empowers solopreneurs to build profitable online businesses. For over two decades, SBI! has been trusted by members to turn their passions, hobbies, or skills into successful ventures. Recently, the introduction of ChatGPT has ushered in a new era of AI-assisted content creation within SBI!.
Allow me to introduce you to Tai, your business-building AI assistant. Tai is now available in SBI! and can help you navigate the world of online entrepreneurship. Whether you’re a complete beginner or an experienced solopreneur, SBI! provides everything you need to create an income-generating website or blog.
Here are some reasons why starting an online business with SBI! and Tai is a great choice:
- Adaptable Lifestyle: Building an online business adapts to your desired lifestyle. Enjoy newfound freedom without being tied down to another job.
- Low Startup Costs: You don’t need significant capital to begin. All you require is a computer, internet access, a roadmap, and an affordable platform like SBI!.
- Flexibility: Work as much or as little as you want, wherever you choose. Once you’ve built a solid foundation, you can earn money even on days you don’t actively work.
- Portability: Take your business with you, especially if travel is part of your retirement dream.
- Global Impact: Help people worldwide by sharing your knowledge and expertise.
- Continuous Learning: Running an online business keeps your mind active and energized.
SBI! combines education, tools, and a proven process to give you the highest chance of achieving your financial goals. Whether you’re aiming for financial independence or simply want a rewarding project during retirement, SBI! can guide you.
If any of this resonates with you, I invite you to explore SBI! and discover how it can help you build your online retirement business. Even if you’re a beginner, SBI! provides the resources you need to succeed. Say hello to Tai and embark on your entrepreneurial journey! 🚀
Learn more and try Tai for free on the Solo Build It! website.
Recent Articles
-
doll's pram on wheels
Mar 09, 25 08:53 AM
 My name is Maryvonne Please, could you help me? I want to build a doll pram but I would like a plan. Thank you very much for your answer.
 -
Toy doll high chair
Mar 09, 25 08:52 AM
Dear Sir/Madam I am looking for a plan to build a toy doll high chair, I built the rocking horse you have on your page from one of your plans and it worked -
Angle of ramp
Mar 09, 25 08:51 AM
 Hello there I found your website whilst looking for details of how to make a new ramp for a walking ladybird that belonged to my children in the 90s. The