Construction Toy Plans

Construction toy plans to build this wooden toy road roller.
Complementing my road grader design, this toy steam roller is easy to make using a few basic tools.
An essential part of road construction, the steam roller gets its name from the original machine that was actually powered by steam. The modern version looks quite different, and indeed it has a different name, but it has nothing of the romance of steam, at least as far as making toys is concerned.
Somehow the very shape of the steam roller describes it's function: this is a machine that means business, and it will serve you best that you keep out of the way.
This modern version road roller Mk2 is about 25% larger than Mk1, and has wheels 70mm in diameter.
Materials
This toy can be made from leftover bits in your scrap box. Mk1 was made with 19mm thick project timber, and Mk2 was made with recycled timber that was between 21mm and 23mm thick.
Tools
Most if not all hobby woodworkers and handymen (or handywomen) will have a selection of tools to complete this simple project.
For cutting out the parts, I used a bandsaw, but only because I have one. Most of the cutting can be be done with a hand saw. Anybody who has experience with a table saw will know that the parts are too small to use one safely.
I also have a 12” disc sander, and I find this indispensable for trimming end grain. Of course, a block of sandpaper or a wood file could also be used.
If you are going to make your own wheels, a drill press is an essential item when using a circle cutter.
Note Mk2 uses wheels of 70mm in diameter, while Mk1 uses a more commercially available wheels 50 to 60mm in diameter.
Building guide
This is a summary of the building guide which is part of the free PDF plan. This file includes all the step by step instructions and the full size patterns.
The example shown below relates to steam roller Mk2, and can also be used for Mk1.
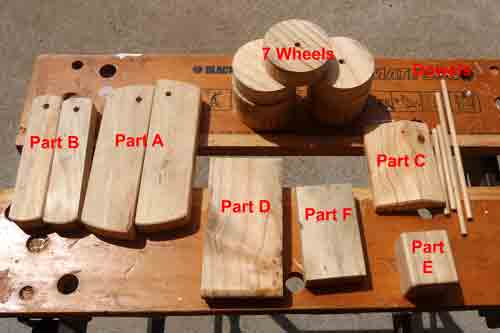
All the parts cut out and ready to assemble.
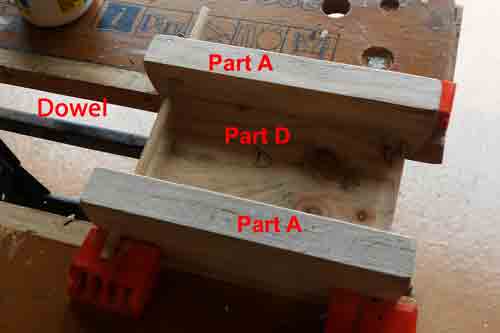
Making the chassis sub assembly, fixing Part A to Part D using the dowel axle to keep the parts aligned.
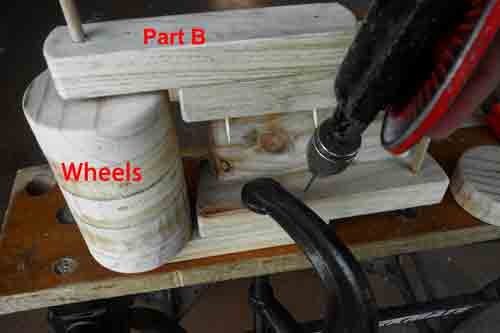
Attaching Part B to the chassis sub-assembly.
The photo shows how to use the wheels to fix the position and to drill a pair of small holes for toothpicks to keep the parts from creeping under clamping pressure.
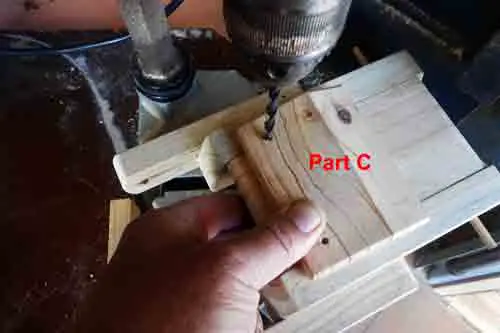
Adding the roof of the cab.
To be sure the holes for the dowels are in line, I am holding it in position as shown in the photo.

The toy steam roller Mk2 complete with driver, ready for painting in construction yellow.
Painting and finishing
Leave it in it's natural state, or apply your favourite finish. I used yellow food colouring for a bright yellow finish. To make the wheels black, I mixed all the food colours together.
For information on food safe finishes and dyes, visit U-Beaut.com.au includes links to international suppliers.
Download Construction Toy Plans
Download the free printable PDF road roller.
More Toys For Boys
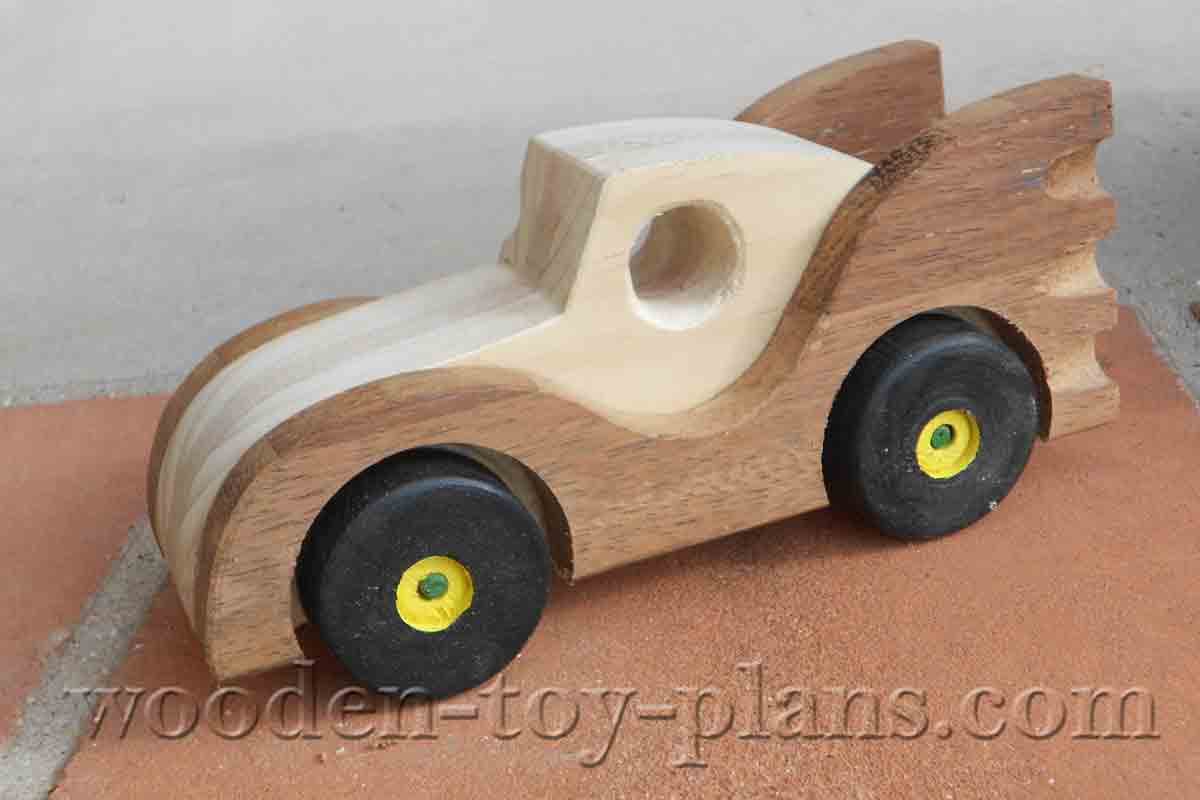
Batmobile Toy Car Plans build your home made toy. Full size templates.
Free plans to build your very own batmobile toy car out of wood. Simple design for beginners.
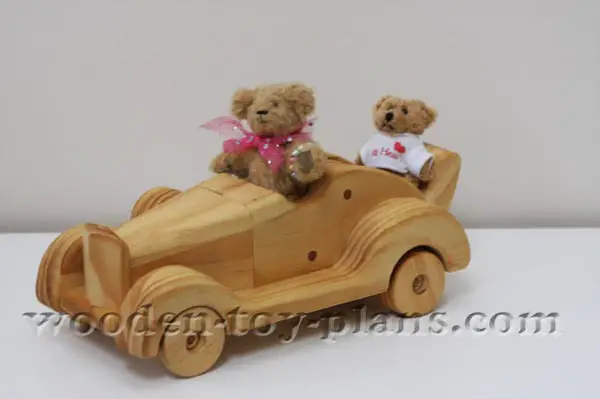
Wooden Toy Car Plans fun project free design
Free wooden toy car plans. Make your own wooden toy car with these free plans that include step by step instructions with diagrams and photos.
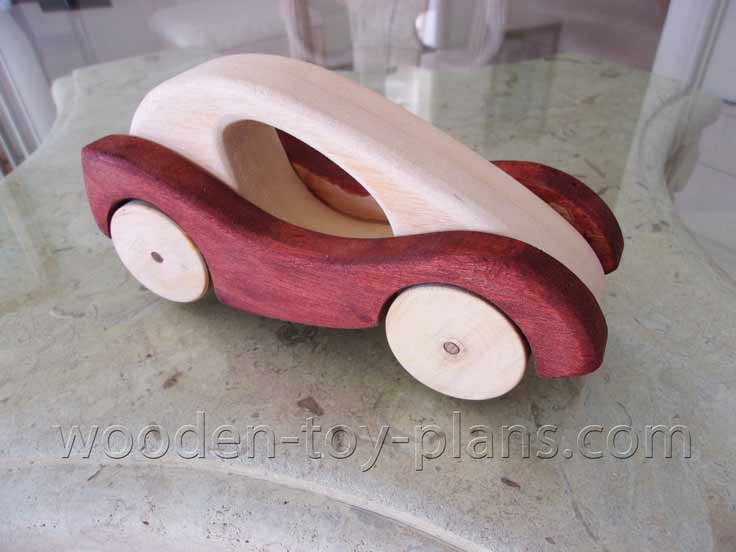
Wooden Toy Car Plans print ready PDF download woodcraft project
Wooden toy car plans free to download. Fun to make roadster ideal for beginner with limited tools. Detailed plans and building guide.
Share your construction toy project.
Do you enjoy making construction toys? Share your latest project here.

How to turn your hobby into a profitable business.
Solo Build It! (SBI!) is an online platform that empowers solopreneurs to build profitable online businesses. For over two decades, SBI! has been trusted by members to turn their passions, hobbies, or skills into successful ventures. Recently, the introduction of ChatGPT has ushered in a new era of AI-assisted content creation within SBI!.
Allow me to introduce you to Tai, your business-building AI assistant. Tai is now available in SBI! and can help you navigate the world of online entrepreneurship. Whether you’re a complete beginner or an experienced solopreneur, SBI! provides everything you need to create an income-generating website or blog.
Here are some reasons why starting an online business with SBI! and Tai is a great choice:
- Adaptable Lifestyle: Building an online business adapts to your desired lifestyle. Enjoy newfound freedom without being tied down to another job.
- Low Startup Costs: You don’t need significant capital to begin. All you require is a computer, internet access, a roadmap, and an affordable platform like SBI!.
- Flexibility: Work as much or as little as you want, wherever you choose. Once you’ve built a solid foundation, you can earn money even on days you don’t actively work.
- Portability: Take your business with you, especially if travel is part of your retirement dream.
- Global Impact: Help people worldwide by sharing your knowledge and expertise.
- Continuous Learning: Running an online business keeps your mind active and energized.
SBI! combines education, tools, and a proven process to give you the highest chance of achieving your financial goals. Whether you’re aiming for financial independence or simply want a rewarding project during retirement, SBI! can guide you.
If any of this resonates with you, I invite you to explore SBI! and discover how it can help you build your online retirement business. Even if you’re a beginner, SBI! provides the resources you need to succeed. Say hello to Tai and embark on your entrepreneurial journey! 🚀
Learn more and try Tai for free on the Solo Build It! website.